Tuesday, June 17, 2014

How To: Make a Figurine Cake Topper (Part 1)


Hello all my lovely fellows and amazing followers!!! I am really excited to share with you guys a really easy figurine topper. This time I will show you just how to make the head and facial features. You can practice from there, and this is something you need to keep in mind: practicing will take you  to a higher stage on your work. 

I am starting with a really easy face, nothing too complicated but that is cute to present. I really love to make these kind of faces when I am making a general face: customer tells me about gender, skin color, hair color and length, and clothes color. Nothing too specific or too complicated. 
Knowing the age is an important part of building the right face feature : baby faces are bigger and also cheeks are fatter, on the case of younger faces like teenager's faces, cheeks can be widen a bit. 


 What will need :


  • fondant, you can add a bit o CMC or Tylose to make it dry better, specially if you live in a really warm and humid area. 
  • modeling tools 
  • edible glue 
  • black edible pearls 
  • 1" styrofoam ball


Why i use styrofoam ??? It is the best way to shape a head!!! you can make it as big as you want but styrofoam will get rid of so much heavy fondant , that is the main WHY.
This is an easy step: make a fondant ball the same size of your styrofoam ball and put the ball inside. Bring all the sides to the topper part and cut the excess. Now use your palms to make it rounded and get rid of wrinkles.


Using either your finger or a modeling stick , push the head to make a sort of separation, that will give you the shape for the eyes and cheeks.


                                                        This is how you will look at it on the side.


Now that you have the face defined, mark where do  you want the eyes to be place, you can use a toothpick for this: they can be separated or closer. You will need to Keep this in mind: the more separated they are, the more melancholic and bit sad they will look, the closer the eyes the  funnier can crazier they will look.  You can play with that.

Add just a bit of water and attach the black pearl, and stick it to  the fondant, push it in gentle.


 Using a fine long brush, add some eye lashes, for girls and babies and of course the eyebrows. If you make a mistake, don;t worry, grab a cotton swab and some clear vodka or water and gently wipe it off and start over.  TIP: Remember that if you wet the pearl too much, part of its shine will fade off.


Once the eyes are done, let's start with the mouth. For this you can either use a modeling tool like this one or a round tip #12 and mark the smile.
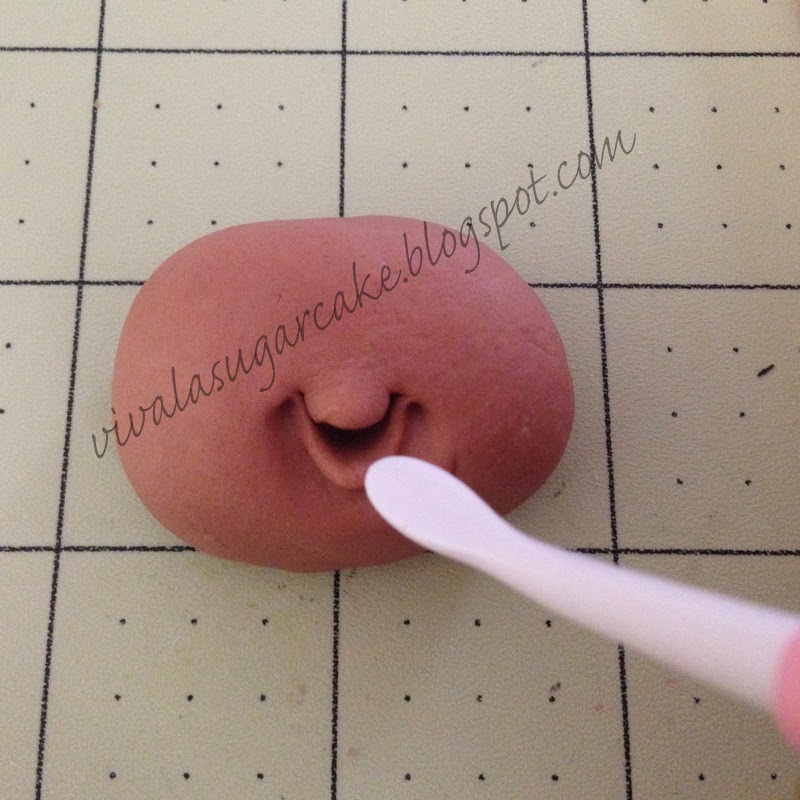


Let's now focus on the mouth, this part takes time, you can mark a simple smile or you can go for the practice and look for thicker lips and even teeth. Using one of the flat modeling tools, open the mouth and mark the bottom lips. This part is really easy and you will see how the lips ill appear.


Mark now the upper lip, in this case the upper lip is also thick and I use a kind of heart shaped move to shape it. As you can see Tools are beyond important, remember even the best surgeon can't show how amazing he is without the right tools. Soon I will be teaching you about some easy to get tools.
I n this case I used 3 modeling tools, this blue one is called  " paint eraser" this one is #6 firm, it can also be black, gray and white are too soft, but still really useful. Using the eraser, i pushed down to make a deeper heart shape on the upper lip.


It is really important to define the lips by marking and smoothing. This can also be done with a flat and pointy soft tool. Make sure to mark the corners of the mouth, specially because she is showing a big smile.


Add a tiny little piece of white fondant for the teeth, wet the the upper part of the mouth and add the teeth. You can grab a mirror, see yourself, smile, see how your teeth show, I looked at mine and I only show upper teeth. It is also a great idea to actually touch your face making expressions: like how your eyes go down when you frown, or when you smile etc. and PRACTICE !!!


Finally, you need to add some make up: using the tip of the brush, touch a bit of glycerine and a bit of petal dust and you will have a perfect lipstick !!! of course you will need to add a little all for the nose and some petal dust for the cheeks, just a bit!!!


I hope you like this first part of this tutorial, please practice just the head: change the shape and the look, the skin colors and even the mouth. but practicing is a plus.


Here are few of my really easy figurines, they are really cute and easy to make,


 Cakey Looove !!!, Joly 


Monday, June 2, 2014

Tutorial: How to add pearls or dragees to a cake (not the one by one way)


I had this wedding cake last weekend, and I started wondering the easiest and faster way to add these. Honestly Thinking about adding these one by ones, was not in my plans at all !!! I decided I wanted to try to make it work for me and for the time i could work on a cake. I am really bad about making cakes that are too time consuming.  I tried few ways and this is what I encounter: white chocolate got dry way too fast and dragees kept on falling off, corn syrup never actually dried off !!! so i decided to try using Royal Icing !!! and it worked!!! 

 What do you need: 

  • Draguees or Perlized sugar pearls, I got them here
  • Royal icing, following the 20 seconds rule, I follow Sugarbelle Rule 
  • Off set Small spatula 
  • Large and deep container, not too deep or it will be hard too hard to reach your cake, not too flat or all your draguees will be jumping everywhere 
  • small bowl to place your cake on top of it 
  • Pipping bag and round tip #2 or #3
  Cakes are heavy, thinking about rolling this cake on a pile of pearls was a total no no !!! Real cakes are heavy, soft and hard to move. There was no way from me to roll the cake on the draguees, specially these tapered cakes for this wedding cake, where each one is 8" tall !!! 


 For these cake I decided to go with a combination of different size draguees. Their metric size is measure in mm and I got 3mm, 4mm,5mm and 6 mm with are the larger on first picture.  I also added  some perlized sugar pearls in Ivory, so it will give it a little more vintage look on the group of pearls. 
At this moment you are wonder : How much should I get? for covering an entire 10"x 4"cake, you would expend all these jars. If you are looking to cover  many cakes, then the best option will be buying in bulk. 
For this particular cake, I used 2 jars of 3mm draguees and half jar of the rest sizes.  The draguee that covers and adhere the best is the 3mm one. 

You will not need much Royal Icing, at least not for a project like this one. In case you are looking to cover the entire cake, then you might be need 2 or 3 cups Royal icing.  Consistency is important, i used the consistency I usually use for decorating  my cookies, you don't want it too runny but neither too thick. A Perfect Consistency , will help the draguees stay in place and  dry not too fast but not too slowly. To liquid consistency, might make the draguues to fall off your cake and loose their color. I will ask for the 20 second rule or the medium stiff consistency.


I used this container That I loooove, honestly I use them for everything : from keeping my fondant cutouts to use later on a cake, to cupcake holder to transport them, they are perfect because they have lid, these were a great buy !!!!  I also use a small upside down bowl, like an ice cream bowl , to place the cake on top. the idea is to lift the cake form the bottom of the container. Remember My cakes always have a board under each tier. I understand some recipes are dense enough and bakers don't need to add any board under any tier, so for this project, consider to add a cake drum, cake board etc to each tier or you will have a massive disaster. ALso this is the time to open each draguee jar and pour them on the container, carefully or all the jumping draguess will be everywhere, except your container !!!


Now, place the cake on top, as you can see the bowl is big enough to hold the cake, you might need to use different bowls depending on the diameter of your cakes. 


The way I wanted the draguees to be placed on the cake, were more in a whimsical way, so I really did not need it to be totally perfect. I made some waves, not all over the cake, this is a little by little process so you can have everything under control: if you add it all over, it might get dry before you are able to reach the othe side. I put   Royal Icing on about 4 " each time. If you are looking to cover the entire cake, put Royal Icing  form up to bottom, like following an imaginary stripe on the cake  Once you add the Royal Icing, get ready to work in a faster pace, or it will get dry and draguees will not stick to it. 

TIP: consider  coloring  your Royal Icing if your cake has different color than white. 


With really dry hands, grab a bunch of the draguees and stick them to your cake, as easy as that, be careful not to push too hard and get you cake off the bowl. Remember not to keep the draguees for to long on your hand, specially if your hands tent to sweat: humidity  wipes the sparkly color off the draguees. Continue doing this process until you cover all the Royal Icing you spread over the cake. I prefer to go by sections and look for imperfections, sometimes you will need to add the draguees several times, but they truly add really easy. 

Once I finished that section, I saw many irregularities that I do not like at all. Now you will need to fix this. As I said, I prefer to work on each section at a time, and don't go to next section until I am happy with the result.


Where ever I found irregularities, I used the piping bag with some Royal Icing, this way I can specifically add draguees where I need to cover a empty or irregular space. For this part you will have to add draguees one by one, making sure, if draguees are different sizes, that you try a little bit to get the right one that better fills the space you are trying to fix.


Once you are done with that section, move on tho the next one until you cover oll the surface you are looking to cover. Let your cake dry before stacking. Get ready to miss some spots, to have draguees everywhere jumping away from you like crazy, and some other loose on your board. Once I set the cake on the board and stacked it, I used the manual vacuum to get rid of some of the loose one.


I hope it also works for you!!! Cakey  loove, Joly


Monday, May 19, 2014

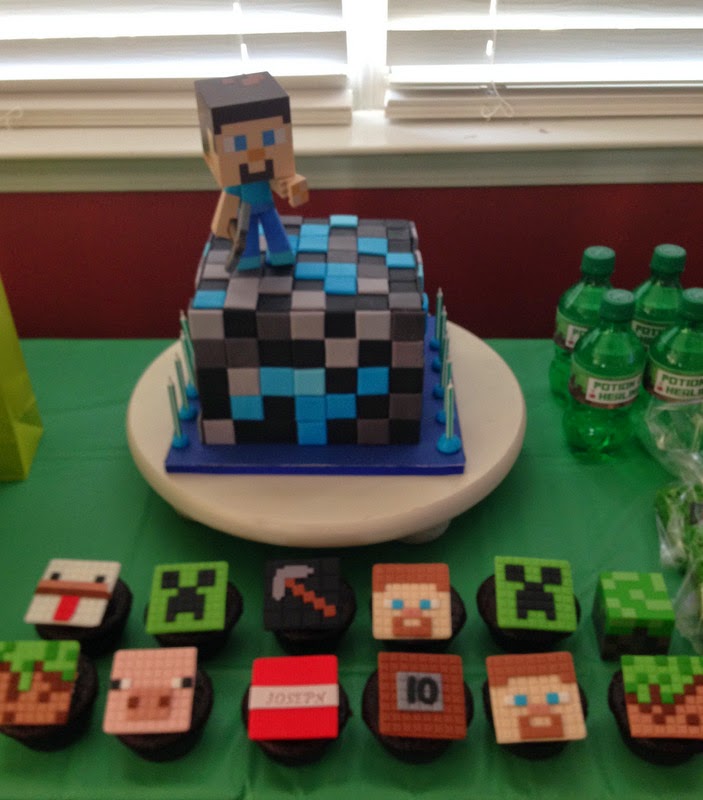
Tutorial: super Easy Minecraft Cake


Hello my lovelies !!!

I know it's being a while since my last post, but sometimes life gets too busy to take the time to do what I really love to do: teaching  sugar stuff!!!

This time I made a super easy Minecraft Cake. If you are like me, who have two super active all boy boys, and are between ages 7 and 15, you probably know what Minecraft is!!! Well for those who are still wondering what in the world is, basically is a video game who actually started only for computers, and has become so utterly famous that Xbox decided to adapt it to their consoles. It is basically a world (Rally squared one) where players built what they want the way they want it: They dig, build, destroy, fight, and many fun things. Basically all this planet? is squared and pixeled: from animals, to people, to armor and food.

My son who turned 10 this year, asked me for a Minecraft part, and I must say that wasn't easy job since there is no place to actually buy the party supplies anywhere !!! Well here is where Pinterest is a must !!! I even opened a Minecraft Board  !!!

I found many many amazing stuff!!! from favors, to food, to decoration and even super nice printables.   One thing that I wasn't able to find was a decent easy cake !!!  Don't misunderstand my words, but must of the cakes I found are totally too much time consuming!!! Gorgeous for sure but honestly I am not the kind of mother that misses all the fun because is totally exhausted after making a 4 tiers cake with a million of tiny little squares in 5 different shades and colors to get the dream cake done !!! no way Jose!!! 

So, since I also had some other orders going on and I really wanted to be ready for 4 hours of crazy laser tag with a bunch of kids, I decided to make a nice and easy cake, here is how:


I started by baking 3  8" squared cakes that I  torted and filled with buttercream. Since it was cold weather, i used all butter buttercream to cover the cake. You can also use ganache if  the weather is not so fresh.

The cake really needs to be completely squared after you cover in buttercream or ganache, that is a plus for this project; Minecraft is a squared place, where everything is squared so please pay attention to your edges.
Start by rolling your black fondant, best fondant to use is a fondant that has little part of modeling chocolate or that is firm enough to easily hold its shape. Do not roll it so thin, we are making plaques for each side of the cake and the top part. 


You need to use one of this embossing plastic mat that only has squares, this one makes 1" squares, it is basically meant to emboss quilt texture on fondant cakes, this one is actually how easily fake the squary world of Minecraft on a cake!!!


If you notice, this mat actually makes squares but you will notice them if you use the mat diagonally. It is just a little trick!!! I pressed the plastic mat over the fondant so I can actually imprint over the fondant all the squares I need to produce the Minecraft effect.


As you can notice, not all the leaves good marks over the fondant, here you can use this  kind of tool to mark it as good as possible. Once you nicely mark the squares on the fondant, measure one side of your cake and cut the fondant so you can actually make 5 panels total: 4 for the sides of the cake and one for the top of the cake. Please reserve. I pace my panels inside a plastic box so they don't get all dry but they are still firm to easily place them on each side of the cake.


If you know a little bit about Minecraft world, you probably know this block is blue because is Diamond (really valuable for making amazing tools, but really hard to find). My son wanted his cake like a diamond not like the green and brown  one that is just grass. I know I know, you might be lost already!!! LOL


Here are some pics so you can have a better idea how to pixel your cake.  Going for the blue one was actually easier for me and more satisfying for my son, and  trust me on this: blue blocks a super hard to find but once you find it, you can get the best of the tools EVAHHHH!!! LOL  (I m definitely sounding like my son )


For this cake I used: Black fondant, light blue, deep neon blue, deep grey, and light grey. I proceed with the same principle: making squares by embossing over the fondant. This time, once I started on the colors, I embossed then cut using my pizza cutter.


 And Now it is the time to turn yourself squared and cut and cut as many squares as you can using different tones of blue and gray so you can have the pixeled effect on the cake.

Once you have many squares cut, it is just time to place them over the black piece of embossed fondant you previously reserved inside a box. I arranged them following a picture, but I simply had fun placing the different colored squares all over the black piece of fondant that i previously embossed: one colored squared on top of the embossed mat, you will use the imprint  as a guide so your squares look as straight as possible.  You might find that few squares will not fit perfectly on top of  the black embossed fondant, just cut it a bit or make it fit on each squared mark on the black fondant. Remember that the black fondant is a guide and a plaque to easily add the 100 squares to your project.


Simply wet the side of the cake and add the panel making sure it fits on each side of your cake. Working with a mixture of fondant and Modeling chocolate is a great idea to work faster and easily. Fondant that is too soft will turn  this easy cake into a traumatic project. Remember that when you are making any project or any cake, having the right tools and material is a plus, imagine a surgeon trying to save a life using a bunch of useless or improvised tools or material. Get the right tools and the right material!!!  for making the Chocolate fondant click HERE


This cake is really small one, I used a 7" squared cake plus adding the buttercream it was actually less that 8" wide and about 6" tall for  each side. You can make it more squared by adding more cake and measuring. if your cake is bigger that this, you will need to use a board to help you add the side pieces. Basically you put the panel on the board, facing down, wet the panel so it can stick to the cake, and lift the board really close to the cake so it can stick to the cake, be careful, sometimes repositioning the panel might affect the shape of it.


For this party:

Cupcake toppers by :  Cakes by Angela Morrison 
 Printables:  Here
Cake: Viva La Cake 
 You can find these ideas and many more following me on Pinterest