Tuesday, June 24, 2014

Tutorial: How to Make a Maleficent cake topper


Ohhhh nothing more entertaining for me than just to sit on my chair and start making cute little faces, yes cuute!!! even if we are talking about Disney's "Maleficent"  with Angelina Jolie, that one that tells the real story behind that wicked witch. 

Well, i totally fell in loove with the movie and wanted to make a cute topper, and cute means no dark malicious eyes or sharp gestures. So I bring you today how to make a cuuute Maleficent cake topper, let's start: 


What you need:

  • 2"x3" styrofoam cone 
  • 2" styrofoam sphere
  • fondant: black,  neon green, purple
  • modeling tools 
  • rolling pin
  • circle cutters (MIA on the pic)
  • edible glue or water or vodka 


Start with a 2" styrofoam and same size fondant, put the ball inside,  you can see this tutorial  to understand this step. Make it look sort of an apple: wider on top, narrowed on lower part.


Use your finger or a small rolling pin to mark on the face where the eyes will be and to make the cheeks. use the rolling pin to smooth the face.


The distance for the forehead should be wider, so you can have enough room for the hair or the hat in this case 


For this step, you can use any of your piping tips, you do not need to buy many tools all the time, look around and you will find many great tools. I use round tip #10 and #12  for making eyes. Cut a little corner of your tiny circle so you can add a side detail on the doll's eye..


For the rest of detail, just make a tiny sausage and thin the sides and add the eye lashes. Cut little green circle for the iris and the shine on the eyes. 


Add the mouth, and 2 tiny round circles using round tip #10 
 Tip:  When ever I do not have the right round size i need, i roll my fondant thicker cut the circle and press it gently in between my fingers so it can be bigger. 


Use a large heart cutter to to cut the shape of the hat or hood that she wears, then use a large circle cutter (4" 1/2 at least) to cut a circle to add it to the witch head. Most of the time I roll the fondant thicker so I can have more chance to smooth it thinner and cover all the head. 


Make a sausage and thin sides, cut in half and make the horns: they go inside then outside like an "S" 


Once you make the horns, add half toothpick on the sides of the head, like where you would add some piggy tails. Glue the horns and add purple details using your clay extruder. 


On the styrofoam cone, add a pice of flower wire, you can buy it here 
I glue it to the styrofoam so it doesn't move. Cut a purple stripe and add to the bottom trying to ruffle it a bit. Best way to stick is using a bit of shortening directly on the fondant. Add a wooden skewer just on the top of the cone all the way through the cone.
Tip: Styrofoam never ever should touch the cake surface, add a piece of fondant on the bottom of the styrofoam piece. 

Cut a large circle  to cover the body, put it on top as you are putting a shirt. cut the sides where the fondant meets the wire and hide on the sides and smooth. Cut 2 purple stripes about 1/2" wide for the dress details on the front 


Cut a small circle and and add and irregular stripe to the circle, you can use a special cutter or use your imagination to make it look irregular. Fold the circle over the wire so you can make the arms.
 I add some disco dust to make it more dramatic look. 

Here is the final cake !!   TADAAAAA!!!


For a more detailed class on how to make your little figurines, don't forget to check on new CRAFTSY class from amazing topper artist Brenda Walton from Sugar High


Tuesday, June 17, 2014

How To: Make a Figurine Cake Topper (Part 1)


Hello all my lovely fellows and amazing followers!!! I am really excited to share with you guys a really easy figurine topper. This time I will show you just how to make the head and facial features. You can practice from there, and this is something you need to keep in mind: practicing will take you  to a higher stage on your work. 

I am starting with a really easy face, nothing too complicated but that is cute to present. I really love to make these kind of faces when I am making a general face: customer tells me about gender, skin color, hair color and length, and clothes color. Nothing too specific or too complicated. 
Knowing the age is an important part of building the right face feature : baby faces are bigger and also cheeks are fatter, on the case of younger faces like teenager's faces, cheeks can be widen a bit. 


 What will need :


  • fondant, you can add a bit o CMC or Tylose to make it dry better, specially if you live in a really warm and humid area. 
  • modeling tools 
  • edible glue 
  • black edible pearls 
  • 1" styrofoam ball


Why i use styrofoam ??? It is the best way to shape a head!!! you can make it as big as you want but styrofoam will get rid of so much heavy fondant , that is the main WHY.
This is an easy step: make a fondant ball the same size of your styrofoam ball and put the ball inside. Bring all the sides to the topper part and cut the excess. Now use your palms to make it rounded and get rid of wrinkles.


Using either your finger or a modeling stick , push the head to make a sort of separation, that will give you the shape for the eyes and cheeks.


                                                        This is how you will look at it on the side.


Now that you have the face defined, mark where do  you want the eyes to be place, you can use a toothpick for this: they can be separated or closer. You will need to Keep this in mind: the more separated they are, the more melancholic and bit sad they will look, the closer the eyes the  funnier can crazier they will look.  You can play with that.

Add just a bit of water and attach the black pearl, and stick it to  the fondant, push it in gentle.


 Using a fine long brush, add some eye lashes, for girls and babies and of course the eyebrows. If you make a mistake, don;t worry, grab a cotton swab and some clear vodka or water and gently wipe it off and start over.  TIP: Remember that if you wet the pearl too much, part of its shine will fade off.


Once the eyes are done, let's start with the mouth. For this you can either use a modeling tool like this one or a round tip #12 and mark the smile.


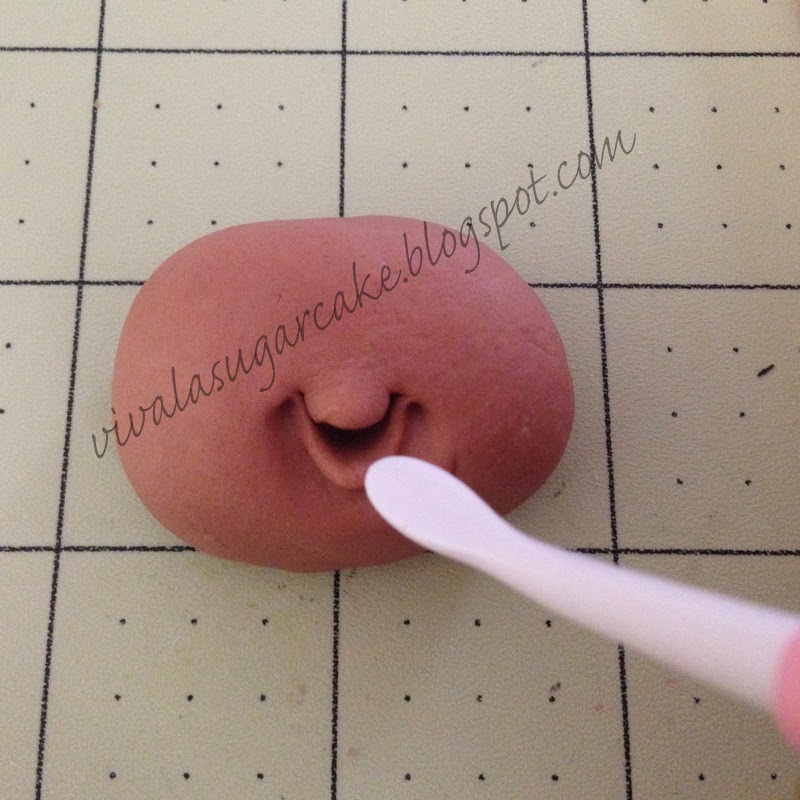
Let's now focus on the mouth, this part takes time, you can mark a simple smile or you can go for the practice and look for thicker lips and even teeth. Using one of the flat modeling tools, open the mouth and mark the bottom lips. This part is really easy and you will see how the lips ill appear.


Mark now the upper lip, in this case the upper lip is also thick and I use a kind of heart shaped move to shape it. As you can see Tools are beyond important, remember even the best surgeon can't show how amazing he is without the right tools. Soon I will be teaching you about some easy to get tools.
I n this case I used 3 modeling tools, this blue one is called  " paint eraser" this one is #6 firm, it can also be black, gray and white are too soft, but still really useful. Using the eraser, i pushed down to make a deeper heart shape on the upper lip.


It is really important to define the lips by marking and smoothing. This can also be done with a flat and pointy soft tool. Make sure to mark the corners of the mouth, specially because she is showing a big smile.


Add a tiny little piece of white fondant for the teeth, wet the the upper part of the mouth and add the teeth. You can grab a mirror, see yourself, smile, see how your teeth show, I looked at mine and I only show upper teeth. It is also a great idea to actually touch your face making expressions: like how your eyes go down when you frown, or when you smile etc. and PRACTICE !!!


Finally, you need to add some make up: using the tip of the brush, touch a bit of glycerine and a bit of petal dust and you will have a perfect lipstick !!! of course you will need to add a little all for the nose and some petal dust for the cheeks, just a bit!!!


I hope you like this first part of this tutorial, please practice just the head: change the shape and the look, the skin colors and even the mouth. but practicing is a plus.


Here are few of my really easy figurines, they are really cute and easy to make,


 Cakey Looove !!!, Joly 


Monday, June 2, 2014

Tutorial: How to add pearls or dragees to a cake (not the one by one way)


I had this wedding cake last weekend, and I started wondering the easiest and faster way to add these. Honestly Thinking about adding these one by ones, was not in my plans at all !!! I decided I wanted to try to make it work for me and for the time i could work on a cake. I am really bad about making cakes that are too time consuming.  I tried few ways and this is what I encounter: white chocolate got dry way too fast and dragees kept on falling off, corn syrup never actually dried off !!! so i decided to try using Royal Icing !!! and it worked!!! 

 What do you need: 

  • Draguees or Perlized sugar pearls, I got them here
  • Royal icing, following the 20 seconds rule, I follow Sugarbelle Rule 
  • Off set Small spatula 
  • Large and deep container, not too deep or it will be hard too hard to reach your cake, not too flat or all your draguees will be jumping everywhere 
  • small bowl to place your cake on top of it 
  • Pipping bag and round tip #2 or #3
  Cakes are heavy, thinking about rolling this cake on a pile of pearls was a total no no !!! Real cakes are heavy, soft and hard to move. There was no way from me to roll the cake on the draguees, specially these tapered cakes for this wedding cake, where each one is 8" tall !!! 


 For these cake I decided to go with a combination of different size draguees. Their metric size is measure in mm and I got 3mm, 4mm,5mm and 6 mm with are the larger on first picture.  I also added  some perlized sugar pearls in Ivory, so it will give it a little more vintage look on the group of pearls. 
At this moment you are wonder : How much should I get? for covering an entire 10"x 4"cake, you would expend all these jars. If you are looking to cover  many cakes, then the best option will be buying in bulk. 
For this particular cake, I used 2 jars of 3mm draguees and half jar of the rest sizes.  The draguee that covers and adhere the best is the 3mm one. 

You will not need much Royal Icing, at least not for a project like this one. In case you are looking to cover the entire cake, then you might be need 2 or 3 cups Royal icing.  Consistency is important, i used the consistency I usually use for decorating  my cookies, you don't want it too runny but neither too thick. A Perfect Consistency , will help the draguees stay in place and  dry not too fast but not too slowly. To liquid consistency, might make the draguues to fall off your cake and loose their color. I will ask for the 20 second rule or the medium stiff consistency.


I used this container That I loooove, honestly I use them for everything : from keeping my fondant cutouts to use later on a cake, to cupcake holder to transport them, they are perfect because they have lid, these were a great buy !!!!  I also use a small upside down bowl, like an ice cream bowl , to place the cake on top. the idea is to lift the cake form the bottom of the container. Remember My cakes always have a board under each tier. I understand some recipes are dense enough and bakers don't need to add any board under any tier, so for this project, consider to add a cake drum, cake board etc to each tier or you will have a massive disaster. ALso this is the time to open each draguee jar and pour them on the container, carefully or all the jumping draguess will be everywhere, except your container !!!


Now, place the cake on top, as you can see the bowl is big enough to hold the cake, you might need to use different bowls depending on the diameter of your cakes. 


The way I wanted the draguees to be placed on the cake, were more in a whimsical way, so I really did not need it to be totally perfect. I made some waves, not all over the cake, this is a little by little process so you can have everything under control: if you add it all over, it might get dry before you are able to reach the othe side. I put   Royal Icing on about 4 " each time. If you are looking to cover the entire cake, put Royal Icing  form up to bottom, like following an imaginary stripe on the cake  Once you add the Royal Icing, get ready to work in a faster pace, or it will get dry and draguees will not stick to it. 

TIP: consider  coloring  your Royal Icing if your cake has different color than white. 


With really dry hands, grab a bunch of the draguees and stick them to your cake, as easy as that, be careful not to push too hard and get you cake off the bowl. Remember not to keep the draguees for to long on your hand, specially if your hands tent to sweat: humidity  wipes the sparkly color off the draguees. Continue doing this process until you cover all the Royal Icing you spread over the cake. I prefer to go by sections and look for imperfections, sometimes you will need to add the draguees several times, but they truly add really easy. 

Once I finished that section, I saw many irregularities that I do not like at all. Now you will need to fix this. As I said, I prefer to work on each section at a time, and don't go to next section until I am happy with the result.


Where ever I found irregularities, I used the piping bag with some Royal Icing, this way I can specifically add draguees where I need to cover a empty or irregular space. For this part you will have to add draguees one by one, making sure, if draguees are different sizes, that you try a little bit to get the right one that better fills the space you are trying to fix.


Once you are done with that section, move on tho the next one until you cover oll the surface you are looking to cover. Let your cake dry before stacking. Get ready to miss some spots, to have draguees everywhere jumping away from you like crazy, and some other loose on your board. Once I set the cake on the board and stacked it, I used the manual vacuum to get rid of some of the loose one.


I hope it also works for you!!! Cakey  loove, Joly