Hello again my lovely friends!!! I am always so glad to have you around, wishing me the best, sending me so much good energy and follow my work and my thoughts when I post on my Facebook page.
Many many times you had ask me how I make the sharp edges on my cakes, or how it looks so smooth. I had looked for the same information from the first time I saw those amazing sharp edges from Planet Cake in Australia. I bought their book, i followed all their helpful information, but honestly I never got the edges I wanted: razor blade!!!
How I came up with this:
(and I apologize with whomever also came out with this idea if I am providing others with what I found out by merely mistake of calculation)
Back in November I started using Duff's fondant which is great for modeling and it works nicely because is doesn't dry so hard and is amazingly pliable. I believe is a combination of fondant and modeling chocolate which works perfectly for me all the time under any circumstance.
The, for my mom's cake I needed a deep purplish color, and I had some modeling chocolate in blue and some purple fondant and I mixed them together along with some black modeling chocolate as well. when it was time to cover the cake, it kept tearing, then my super clever mom told me: "Why don't you cover it as if is a drum??" and that was I did then I started smoothing the edges and all seams disappeared, and then a big bright light lit my head: EUREKA!!!
But Ironically, I wasn't taking any picture of this process actually; instead I was taking pictures of the bottom tier for a different tutorial :))
Then I started making my own fondant by combining 50/50 modeling
chocolate and MMF, once they are mixed then you can color it using your
regular food coloring. Why I use this way of covering???: because I hate, hate, haaaaaate dealing with fondant!!! this method is perfect for avoiding : air bubbles and tearing fondant and will give you sharp edges. But wait a second: no mater what technique you use for getting sharp edges on your fondant, take this in consideration:
- ganache allows you reach sharpie edges (buttercream sucks for this job)
- This 50/50 modeling chocolate and MMF combination, bring the best of both: flexibility and pliability
- IT ALWAYS TAKES TIME FOR GETTING THE EDGES!!! but experience will make you reduce the time, but not at first.
Now Let me show you how I cover most of my cakes:
This is based in a ganache covered cake. Yes you can do it buttercream covered cake but the final result will not be the same!!!! so keep that in mind if you decide to cover your cake this way.
I first start on a Ganache covered cake: all the time I use the upside down technique created and freely posted at CC by amazingly artist Jeff_Arnett. I use his method both butter cream or Ganache.Buttercream might take longer and it is necessary to use an all butter/ butter cream recipe (no crusting ones), but again I need to insist: trying to achieve sharp edges, means Ganached cake!!!
Put this 2 recipes together: It means make them separated, then mix them, then color it if you wish.
Great things I find in this fondant :
- Awesome taste
- It does not dry so hard as premade fondant or Gumpaste, so I can make my cutouts decoration ahead of time and still manage to place them perfectly on the cake
- Pliability is incredible
- since you are adding MMF, you do not need to use chocolate colors to color the modeling chocolate, just the regular wilton or americolor or what ever color you use.
- this is meant for smaller cakes, anything larger than 10" should be worked in a different way
 |
| Remember how much your cake diameter and height was?? it is now time to make sure your fondant strip is long and tall enough to cover the sides of your cake. I use a long ruler I found at Home Depot, I now cut the fondant strip using my ruler and pizza cutter. Always measure twice then cut. |
 |
| Paint the cake using either water, sirup or just shortening, make sure is well covered. Any part that is not painted, might produce an air bubble on your cake. |
 |
| If you do not feel secure about just lifting the fondant you can roll the strip all around the rolling ping and then unroll it all around your cake. |
 | ||
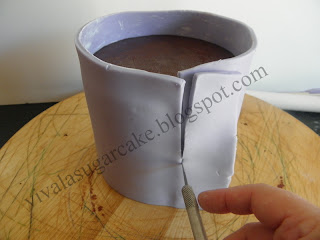
| Once both sides touch use a ultra sharp blade to cut the extra fondant |
So this is the part when you understand why making a mixture of 50/50 modeling chocolate/MMF comes in handy. You need to add some water using your brush. Then you need to smooth using both your fingers and the fondant smoother. You might think this is tedious work, but no matter how you cover your cake in fondant or what technique you use, it will always take time to achieve a great final result.
This Picture show how perfectly you can smooth this seams and make them disappear. Most of the time I do not waist so much time on this: I either leave it for the back of the cake or if you are using stripes as your decoration, cover this with a fondant stripe.
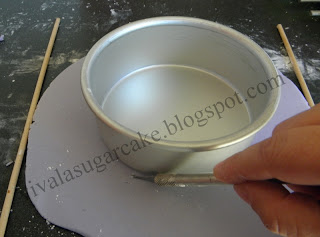
It is time to cover the top of the cake and when the fun really starts: Using the pan you used to bake your cake, cut the shape out of a rolled fondant piece.
Smooth before placing on the cake, always using the fondant smoother and your fingers
Paint the top of the cake with some sirup or water, place the circle you just cut out and place it on top of the cake, making sure you push the edges towards the sides of the cake
Apply more liquid if needed
Smooth always pushing the fondant so it sticks nicely on the sides
Push, smooth, stick
Cut all around the edge with a new blade, that will bring a really clean cut (well this doesn't look so clean)
Wet, smooth, and smooth and smooth (this takes around 10 minutes)
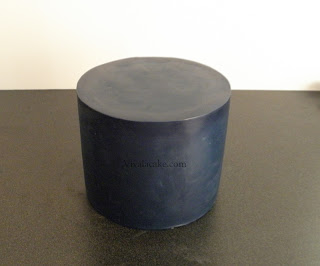
Final result
Here is the cake !! Lovely, isn't it ???

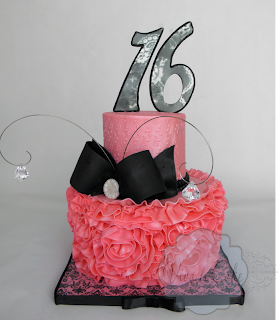
Here is a Sample of cakes I made using this technique
Cakey Hugs, Joly


Thank you for sharing your technique, I love seeing your wonderful cake works.
ReplyDeleteIs this the same technique for all shaped cakes: square. Scalloped, paisley, etc??? And thanks for sharing! I can't wait to try this out instead of the wilton way I was using!!!
ReplyDeleteI have tried it with almost any shape. Including squared, carved ones and heart shaped ones
DeleteGracias!! La verdad es que nunca se me hubiera ocurrido.
ReplyDeleteLo probaré
Thank you for your fantastic tutorial. One question: which technique do you use if your supper sharped edges cake is taller than 10"? Thank you!
ReplyDeleteI invite you To visit my 3D cakes blog!
XXX from Spain!
you should make a double barrel cake. I wouldn't use the upside down technique for covering in either ganache or butter cream, it is a little bit risky. But this wrapping technique is the perfect one to cover a double barrel cake, in fondant.
DeleteJust make sure you have a extra long pin to help you wrap the cake around !!
DeleteThank you for your learning us your method, it's just fantastic! just a little question, the modeling chocolate don't change the color of your MMF? because modeling chocolate is dark. or perhaps it's white modeling chocolate ? I would try your recipe but i want made pastel one. Thanks for your help, best regards. Elsa
ReplyDeleteif you are using white chocolate, you can basically get any color in any shade
DeleteThank you so much for an amazing website!!
ReplyDeleteI'm planning a Monster High cake for my niece's birthday in September but she hates plain fondant, so this combo with the modeling chocolate is perfect. So happy I stumbled upon your blog :) You have some amazing ideas!
Thank you. Around 80% of my ideas are my Mother's ideas, LOL She does not decorate or bake, but she always thinks outside of the box. :))))
DeleteFor the ganache, does it have to be real chocolate or can I use white chocolate? It's going to be a vanilla cake and I don't want chocolate messing with the flavor of it.
ReplyDeleteyou can use any ganache recipe you like. I like this one
Deletehttps://www.facebook.com/notes/ciccio-cakes/white-chocolate-ganache-demystified-tutorial-with-flavoured-option/601363016553257
Can you do this method on buttercream? Or just ganache?
ReplyDeleteYes, you can use buttercream, I have used it a lot, but it is trickier than using ganache. Main reason: buttercream needs to be chilled so it is hard enough to work on it (even if you are covering the cake with the traditional way). I am sure that the best way to get SHARP edges, is definitely using ganache. But if it happens to you that nobody likes ganache, and they all love buttercream (Like here in the south) then give it a try and make sure to cover the edge with some decoration, so you will not need to work so hard on getting a sharp edge.
DeleteHere's a question. I am making a 3 tier round cake for my mom's 80th birthday. The top two tiers will be chocolate or yellow, but the bottom tier I was hoping to make a pineapple upside down cake. I'm thinking the method using ganache or buttercream won't work because the areas around the fruit will allow voids in the top of the cake. Hmmm...
ReplyDeletei m giving you my secret: upside down inside pineapple cake!!! i make the upside down cake as usual, I make one with the pineapple, one without it. When I have to flip it, I flip it on top of the other so the pineapple will be filling and then cover like usually you do
DeleteThanks for the tutorial...made a sharp edged ganache cake but as soon as I draped the fondant over it, it tore at the edges. It was about 4 1/2 inches in height so not sure whether it was the fondant I was using etc. Would this method work with store bought fondant (with modelling choc added) or only with MMF? I live in a very humid country so am not sure about using MMF. Modelling chocolate is great though.
ReplyDeleteHere in this post I said adding modeling chocolate to the mix. I use wilton fondant always. I mix it 50/50 with modeling chocolate. If you find it too soft, put it in the freezer for a while, even after rolling it in your pin. when is sooo hot and warm, I roll it, measure, cut, roll in the pin (make sure you add some cornstarch) and put in the freezer. Since is chocolate, cold temperature make it harder then is easier to unroll around your cake. give it a chance, it is like any technique you should practice and practice. There is no magic trick, only practice :)
DeleteHai thanks for the tutorial.can i apply the Wrapping method to a tall square cake (about 8" tall) to get neat and sharp edges?thanks in advance
ReplyDeletethk u so much...it really helps
ReplyDeleteIt is astonishing to think how much work goes into making a good cake. These cake examples are sufficient evidence of that. I would really like to make something even close to that sometime.
ReplyDeleteCynthia | http://www.oterisitalianbakery.com/menu-item-type/fondant-cakes/
could you cover the cake upside down in fondant then cut off the excess on the bottom instead of around the top??
ReplyDeleteThanks for sharing this wonderful technique . Can i use another type of fondant ( satin ice , sodifer , funckakes ) ????? or just mmf ?
ReplyDeleteWhat do you cover your cake boards with? They are so pretty! Is it just material or edible transfer on fondant?
ReplyDeleteTHANK YOU!! wrapping was SO much less stressful!
ReplyDeleteToday I discovered a new way of baking a fondant cake. Love the way you describe it.
ReplyDeleteYou are writing some Amazing tips. This article really helped me a lot. Thanks for sharing this blog.
ReplyDeleteferns n petals coupons
Amazing post! I appreciate your hard work. Thank you for sharing. I have also share some use full information.
ReplyDeleteThe best Mosquito trap Mosquitron Review
snow teeth whitening
snow teeth white
try snow
Hi, good information mentioned in this blog, Thanks for sharing this. Read more
ReplyDelete