Showing posts with label modeling fondant. Show all posts

Monday, May 30, 2016

How to Make a Teen Ninja Cake Topper


Finally I can sit in front of my computer and start a new post in my almost forgotten blog. My latest post was in October last year!!! wooow how the time goes by and I can barely see it running in front of me, well I only notice time when I look myself in the mirror,,, that can be theme for a different blog!!! I have great excuses for my absence: I have traveled and teach, that can't get any better; I  started back November and I just stopped May. It's been awesome. incredible and adventurous. I have meet amazing cake artists, cake lovers, I have tried curious, delicious and amazing food like Chow ( seasoned fruit)  in Trinidad, delicious tiny tamarind ice creams  in Equator, amazing Quinoa in Peru, wonderful Cuban food in Miami and the endless Chicago Style Pizza !!! Woooow What a Journey and I do not regret the air plane hours and fear (yes they  scare me  to death) or the common food poisoning or the swollen feet, every single minute is absolutely worthy; but the best: all the amazing friends I have met all these months !!!!!   This was a little update and a bit of excuse about Why my blog is being left on the side, but now I am back and I m have plenty of material to keep filling up my blog with cool info for you all my sugarcrafters , so let's start. 

 We will be making this super cuuute cake topper, please don't ask me to do something that does not look cute because then my brain simple shuts downs. You know these ninja Turtles are all but cute, an dI almost freaked out when I was told the theme: TMNT cake with Michelangelo (that is the orange one) AKA Mike (I can see why he is now called Mike) with Graffiti and standing on the logo sewer and so on. Basically I focus on the topper and I look for a different design and I found this cuter look of a TMNT more on the Kid look, so it was just perfect !!! 


Well, less talk and just Let's start and Learn how to make him:


I always start making the head, basically is the best way for me to have a better view of the body proportions; actually when sculpting or drawings, the measure of the head itself, indicates you how the body will be proportioned,
I use a styrofoam ball inside, either you use a  mousse one  or regular one, this allows you to make a big head, subtract some of the weight and have support for when you place the head over your figurine's shoulders.  I started with about 140 grms of gumpaste or fondant  ( if you need it to dry faster, add CMC or Tylose.  Cover the ball with the paste and keep closing your hands around the ball so you make sure there is no air buckets between the ball and the paste. Push all the creases over the top and just cut the excess.


For the head you will end up with an oval, select the smother side and work the face on that part. With your finger, mark the eyes by pressing down a bit, Also, roll the bottom part where the cheeks should go and push down so instead of keeping an oval shape, you can get more like rounded shape with some cheeks.


Use the modeling tool to mark the mouth and add a color  (Orange for Mike ) stripe of about 1 " wide around the eyes


Cut two white circles using tip #12 from wilton, press down the circles so you can make them bigger and reshape them into the eye shape you would like to use, then glue them on top of the eyes, add the iris color that you would like. Set the head aside to dry.


For the body, I decided to also add a styrofoam ball, same size 1"1/2 . Make the same you did for the head but this time flat it all around the edges.  It  is a heavy topper, so the bigger the topper, the more support you will need. 


The shape you are looking for is more like tapered on the sides and bulky on the front and back. Pull the upper part so you can get the neck and press the center where the legs will be placed. 


Add the shell on the back, I used a different green shade; I looked for the right colors online and it seems like there are many different ways to use the colors on the turtles including brown for the shell, it is all up too you. Mark the lines on the shell, just the way you think is correct, anyways this goes on the back and it might not be seen way to much. 


Add the yellow front and add the "Six Pack" , LOL !!! 


Time for the legs: 


I used about 50 grms for the legs, start with a cone shape of about 2" long. Make two of these.  Then press with your finger so the foot part can pop out of the cone shape.  Immediately  and before it dries, follow the next step:


 I use thick wooden skewers, used for corn in the cob, They are thick, strong and hard to break, if you cannot find them (I get mine at Hispanic markets) or you can use chopsticks. Make sure to leave enough to stick it inside your cake.  Add the detail decoration for the legs.  


Once you add all details, holding the leg stick, pass each leg from  the bottom to half of  the body.  If is not enough just adding water and you find it is a bit loose, use a bit of hot glue to attach the legs, remember there is a styrofoam ball in the body, that can easily be glued together. Then Use another dowel to pass it through the neck.


 End your figurine making the arms and details on them. I crossed them so he can show his attitude. and finally I attach them by adding half toothpick on the side  


Once I attached all the pieces together,  I let it rest with some support on the legs in case gravity starts pulling down. I attach the head later, at least on day later so I am sure head will not smash when I push it on the body 


Ready to place on the top of the cake.  Cake should be cool, better if is cover in ganache and fondant, but if you are working with buttercream, you can add at least one thick straw under the topper so it can hold its weight. This is a large topper, I like to work on bigger toppers and more simpler cakes. This guy is about 7" tall but is the focal center of the cake.  Hope  you all like it and give it a try.  Stay tuned because I am having great material for upcoming posts.  See you next time !!!!


Friday, September 4, 2015

Finally my New class is here !!!!!


Finally my online  Class is here and I cannot be more excited about it!!! 

I have work extra hard to make this happened, it's being a long journey and finally the wonderful results are here. I hope you all are also happy about it and remember when you get a Craftsy class, you get  the best instructors from all over the world, and the most up to date craft tendencies. You can  sing up for an account, watch many free videos and the best part is that you can watch them anytime and on your own time. 

You can also ask questions directly to the instructors, post your own work and follow discussions. There is also an amazing blog where artists from all over the world, post ideas, suggestions, trendies and more. 

Since this week is the big Launch day, I have this class 50% off!!! but hurry because it doesn't last too long. 


Saturday, June 15, 2013

How to: Making Chocolate Fondant


 It is so nice When I have the chance, plus the time to start a new post and actually have it ready in less than 3 days, that really means I am having good quality time to keep on posting. This Summer I decided to do more things for myself and my kids, so I slow the number of orders during the summer break. Anyway I have always hated working during this time of the year; I know it is the wedding season etc but it is so much stress to have a decent cake that looks as professional as I like them to look,  with all this heat and humidity we bakers need to endure during the summer time!!! two days ago outside temperature was 87F but humidity made it feel like 95F and my cakes felt it as 104F.
     Specially here in the South, most people and specially Brides, prefer all buttercream cakes opposed to fondant. In Australia where British sugar techniques had to be replaced for more adapted- to- climate- techniques,butter cream (Royal Icing, indeed) was replaced by ganache, and marzipan was replaced by this elastic dough (which I adore) called fondant!!!

    Every body loves the incredibly smooth look fondant brings to the cake and how it is transformed in almost anything your imagination (and few other tricks) can bring to your cake creation;   Bad thing for fondant  is many many years of awful taste fondant.  that some fondant producer brought to scene. Yes I know, it really tasted bad, and honestly most of market brands taste like rubber!! Fortunately, some amazing people started to experiment and they actually create some  good tasting fondants. One of those fondants is called MMF (marsh-mellow fondant) and you can find recipe HERE it is not the best fondant, I personally don't use it for every single cake but it is so elastic and easy to work with, and  it also taste so  good, that everybody is actually using it for all their cakes. It is also easy to make and its shelf life is also pretty good.


I have used a different recipe for a little while and I am so satisfy with final results. I have no idea if someone else already thought about it  (I suppose yes)  This more than a recipe, is a mixture of two different mediums:

                                                  MMF and Modeling chocolate,  find recipe HERE


 What is it so good about this mixture:

  • Taste, yummm!!!
  • No need to get candy color to get the color you need , regular edible colors like americolor, wilton, Baker's choice it is just fine
  • yes, you can cover a cake with it,  see how HERE
  • Yes, you can model figures
  • Yes, you can shimmer it
  • airbrush it 
  • and BIG ETC!!! 

This is How I make it:

You can use any candy melt or chocolate, any color, any brand, the result will be always the same, maybe the taste will vary depending on chocolate brand, I am using black melts because I need deep black fondant for decorating my cake, modeling chocolate recipe is HERE 

Modeling Chocolate Troubleshooting:

  • To avoid fat separating from chocolate, do not over melt the chocolate, just enough to make it melt. I prefer to use the microwave and melt it in sections of 25 secs until is melted
  • once is melted, stir to make sure it is all melted and also to drop the temperature a bit. If chocolate is too hot and we add the syrup, that basically makes the fattening to separate from chocolate. 
  • When you add the syrup, do not stir  so much , just enough to mix it together

Once Modeling Chocolate is ready, let it cool for about 30 min or less. You can still mix it at this stage (if you are in a hurry) but again fat might separate from chocolate, please do not freak out if this happens, you can always fix it . Mix the modeling chocolate and MMF, about 1/2 lb of each, or any amount in equal parts. What ever is easy for you to manage.

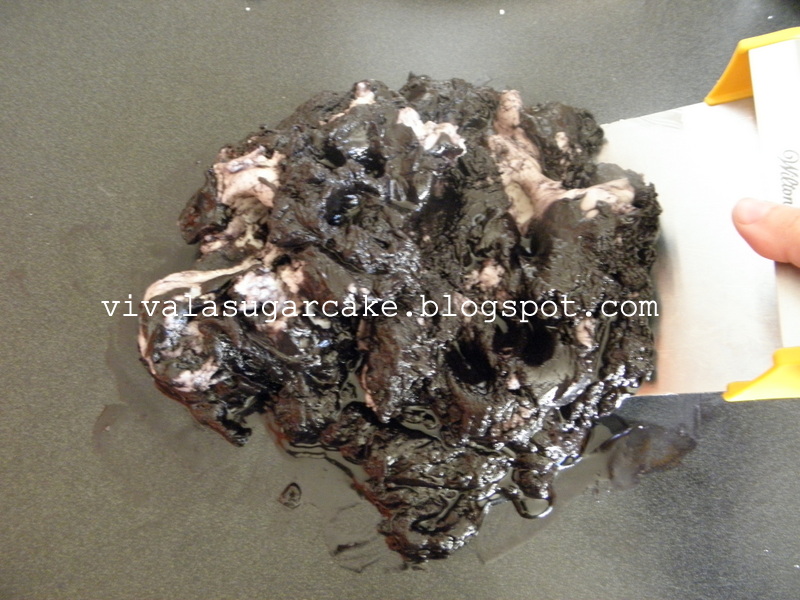
I use my scraper to help me mix it when it sticks on my working table. Some of the fattening ( as you can see in this pic) was released from a too warmed modeling chocolate (YES, I was in a hurry,LOL)


Add some powdering sugar and keep kneading, just as when you knead your regular fondant 


 I need a really deep black color, and at this stage chocolate fondant is more on the grayish shade. I always use Americolor Super black for a really deep black

These are examples of how chocolate fondant would be colored, any shade, any color, using your regular fondant gel or paste colors.

If I want to color some chocolate fondant for my modeling figures, I start with  White melts, or white chocolate mix with white MMF. once is all mixed, I cut it in 1/4 lb pieces and then I color it and storage it.

85% of my work is done using this mixture and I am so incredibly happy with the results: I use it for modeling all of my figurines and for covering my cakes with my Fondant Wrapping technique 


Cakey Hugs, Joly.