


Hello all my lovely fellows and amazing followers!!! I am really excited to share with you guys a really easy figurine topper. This time I will show you just how to make the head and facial features. You can practice from there, and this is something you need to keep in mind: practicing will take you to a higher stage on your work.
I am starting with a really easy face, nothing too complicated but that is cute to present. I really love to make these kind of faces when I am making a general face: customer tells me about gender, skin color, hair color and length, and clothes color. Nothing too specific or too complicated.
Knowing the age is an important part of building the right face feature : baby faces are bigger and also cheeks are fatter, on the case of younger faces like teenager's faces, cheeks can be widen a bit.
What will need :

- fondant, you can add a bit o CMC or Tylose to make it dry better, specially if you live in a really warm and humid area.
- modeling tools
- edible glue
- black edible pearls
- 1" styrofoam ball


Why i use styrofoam ??? It is the best way to shape a head!!! you can make it as big as you want but styrofoam will get rid of so much heavy fondant , that is the main WHY.
This is an easy step: make a fondant ball the same size of your styrofoam ball and put the ball inside. Bring all the sides to the topper part and cut the excess. Now use your palms to make it rounded and get rid of wrinkles.

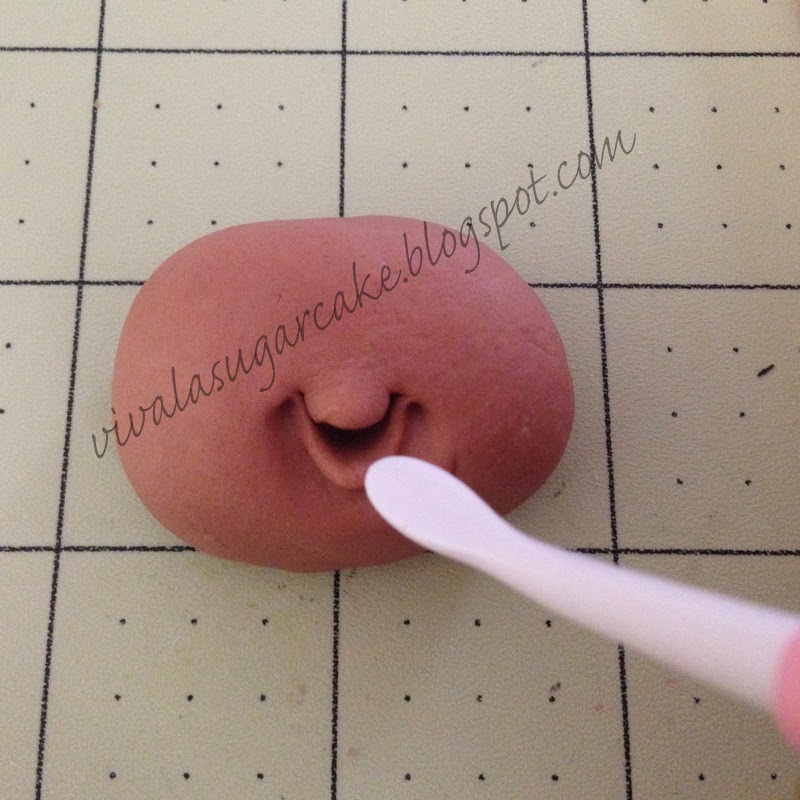
Using either your finger or a modeling stick , push the head to make a sort of separation, that will give you the shape for the eyes and cheeks.

This is how you will look at it on the side.

Now that you have the face defined, mark where do you want the eyes to be place, you can use a toothpick for this: they can be separated or closer. You will need to Keep this in mind: the more separated they are, the more melancholic and bit sad they will look, the closer the eyes the funnier can crazier they will look. You can play with that.
Add just a bit of water and attach the black pearl, and stick it to the fondant, push it in gentle.

Using a fine long brush, add some eye lashes, for girls and babies and of course the eyebrows. If you make a mistake, don;t worry, grab a cotton swab and some clear vodka or water and gently wipe it off and start over. TIP: Remember that if you wet the pearl too much, part of its shine will fade off.

Once the eyes are done, let's start with the mouth. For this you can either use a modeling tool like this one or a round tip #12 and mark the smile.
Let's now focus on the mouth, this part takes time, you can mark a simple smile or you can go for the practice and look for thicker lips and even teeth. Using one of the flat modeling tools, open the mouth and mark the bottom lips. This part is really easy and you will see how the lips ill appear.


Mark now the upper lip, in this case the upper lip is also thick and I use a kind of heart shaped move to shape it. As you can see Tools are beyond important, remember even the best surgeon can't show how amazing he is without the right tools. Soon I will be teaching you about some easy to get tools.
I n this case I used 3 modeling tools, this blue one is called " paint eraser" this one is #6 firm, it can also be black, gray and white are too soft, but still really useful. Using the eraser, i pushed down to make a deeper heart shape on the upper lip.


It is really important to define the lips by marking and smoothing. This can also be done with a flat and pointy soft tool. Make sure to mark the corners of the mouth, specially because she is showing a big smile.


Add a tiny little piece of white fondant for the teeth, wet the the upper part of the mouth and add the teeth. You can grab a mirror, see yourself, smile, see how your teeth show, I looked at mine and I only show upper teeth. It is also a great idea to actually touch your face making expressions: like how your eyes go down when you frown, or when you smile etc. and PRACTICE !!!


Finally, you need to add some make up: using the tip of the brush, touch a bit of glycerine and a bit of petal dust and you will have a perfect lipstick !!! of course you will need to add a little all for the nose and some petal dust for the cheeks, just a bit!!!
I hope you like this first part of this tutorial, please practice just the head: change the shape and the look, the skin colors and even the mouth. but practicing is a plus.
Here are few of my really easy figurines, they are really cute and easy to make,
Cakey Looove !!!, Joly


You really have a lot of imagination!Have a look at my version
ReplyDeleteFigurines