

Hello my lovelies !!!
I know it's being a while since my last post, but sometimes life gets too busy to take the time to do what I really love to do: teaching sugar stuff!!!
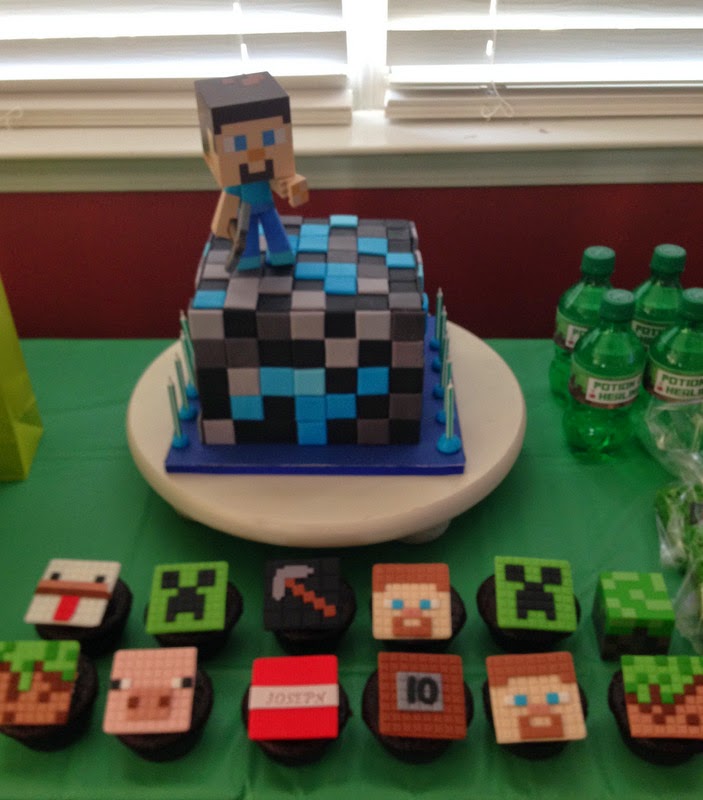
This time I made a super easy Minecraft Cake. If you are like me, who have two super active all boy boys, and are between ages 7 and 15, you probably know what Minecraft is!!! Well for those who are still wondering what in the world is, basically is a video game who actually started only for computers, and has become so utterly famous that Xbox decided to adapt it to their consoles. It is basically a world (Rally squared one) where players built what they want the way they want it: They dig, build, destroy, fight, and many fun things. Basically all this planet? is squared and pixeled: from animals, to people, to armor and food.
My son who turned 10 this year, asked me for a Minecraft part, and I must say that wasn't easy job since there is no place to actually buy the party supplies anywhere !!! Well here is where Pinterest is a must !!! I even opened a Minecraft Board !!!
I found many many amazing stuff!!! from favors, to food, to decoration and even super nice printables. One thing that I wasn't able to find was a decent easy cake !!! Don't misunderstand my words, but must of the cakes I found are totally too much time consuming!!! Gorgeous for sure but honestly I am not the kind of mother that misses all the fun because is totally exhausted after making a 4 tiers cake with a million of tiny little squares in 5 different shades and colors to get the dream cake done !!! no way Jose!!!
So, since I also had some other orders going on and I really wanted to be ready for 4 hours of crazy laser tag with a bunch of kids, I decided to make a nice and easy cake, here is how:

I started by baking 3 8" squared cakes that I torted and filled with buttercream. Since it was cold weather, i used all butter buttercream to cover the cake. You can also use ganache if the weather is not so fresh.
The cake really needs to be completely squared after you cover in buttercream or ganache, that is a plus for this project; Minecraft is a squared place, where everything is squared so please pay attention to your edges.


You need to use one of this embossing plastic mat that only has squares, this one makes 1" squares, it is basically meant to emboss quilt texture on fondant cakes, this one is actually how easily fake the squary world of Minecraft on a cake!!!

If you notice, this mat actually makes squares but you will notice them if you use the mat diagonally. It is just a little trick!!! I pressed the plastic mat over the fondant so I can actually imprint over the fondant all the squares I need to produce the Minecraft effect.

As you can notice, not all the leaves good marks over the fondant, here you can use this kind of tool to mark it as good as possible. Once you nicely mark the squares on the fondant, measure one side of your cake and cut the fondant so you can actually make 5 panels total: 4 for the sides of the cake and one for the top of the cake. Please reserve. I pace my panels inside a plastic box so they don't get all dry but they are still firm to easily place them on each side of the cake.
If you know a little bit about Minecraft world, you probably know this block is blue because is Diamond (really valuable for making amazing tools, but really hard to find). My son wanted his cake like a diamond not like the green and brown one that is just grass. I know I know, you might be lost already!!! LOL


Here are some pics so you can have a better idea how to pixel your cake. Going for the blue one was actually easier for me and more satisfying for my son, and trust me on this: blue blocks a super hard to find but once you find it, you can get the best of the tools EVAHHHH!!! LOL (I m definitely sounding like my son )

For this cake I used: Black fondant, light blue, deep neon blue, deep grey, and light grey. I proceed with the same principle: making squares by embossing over the fondant. This time, once I started on the colors, I embossed then cut using my pizza cutter.


Simply wet the side of the cake and add the panel making sure it fits on each side of your cake. Working with a mixture of fondant and Modeling chocolate is a great idea to work faster and easily. Fondant that is too soft will turn this easy cake into a traumatic project. Remember that when you are making any project or any cake, having the right tools and material is a plus, imagine a surgeon trying to save a life using a bunch of useless or improvised tools or material. Get the right tools and the right material!!! for making the Chocolate fondant click HERE

This cake is really small one, I used a 7" squared cake plus adding the buttercream it was actually less that 8" wide and about 6" tall for each side. You can make it more squared by adding more cake and measuring. if your cake is bigger that this, you will need to use a board to help you add the side pieces. Basically you put the panel on the board, facing down, wet the panel so it can stick to the cake, and lift the board really close to the cake so it can stick to the cake, be careful, sometimes repositioning the panel might affect the shape of it.


For this party:
Cupcake toppers by : Cakes by Angela Morrison
Printables: Here
Cake: Viva La Cake
You can find these ideas and many more following me on Pinterest
Joly, this is GENIUS!! Thank you!
ReplyDelete<3
DeleteAmazing Joly! You make it look so simple.. ! Love it.. !
ReplyDeleteGlad you like it !!!
DeleteBrilliant tutorial, I have just used it and my squares all worked out great, the best Minecraft Cake I have done to date and has saved me tons of time! I love my pizza cutter! LOL! ;-)
ReplyDeleteThat is awesome !!!I am soo glad it worked for you !!!! please share it with us in my facebook page !! we would love to see the final result
DeleteSo glad I found your blog! I'll try it, thanks for sharing!!
ReplyDelete